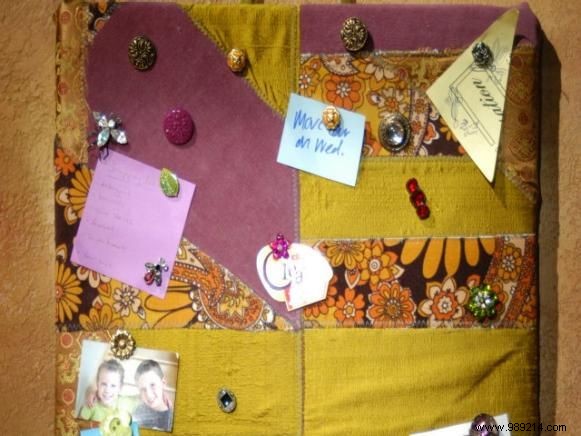
Acoustic ceiling tile (15"x15"), available at hardware stores (can be cut to size with a utility knife)
9" square padded
Medium to heavy weight fusible interface.
Scrap fabric (velvet, funky colors and prints).
Tail of fabri-tac
Backing fabric or felt, cut slightly smaller than tile
18" of decorative ribbon
sewing machine
scissors
pinking shears
assorted snaps and buttons
heavy duty flat thumbtacks
jewelry wire cutters
E6000 glue
1. Use the padded square to trace and cut out four 9" squares of fusible interface.
2. Cut the scrap fabric into random sizes and shapes and place it on the adhesive side of the interface. Arrange the cloth pieces so they overlap without showing an interface.
3. Iron the fabric pieces to the interface using a hot, dry iron. Press down and hold to fuse the interface with the fabric scraps.
4. Using a zigzag stitch, go over the edges of each piece of fabric and sew them together in a crazy quilting pattern. Repeat for each of the four squares, trimming the edges to fit the fabric to the interfacing.
5. Lay out the four squares to make a large 18"x18" square.
6. Overlap the edges of two squares and pin them together. Use a zigzag stitch to sew squares together. Repeat with the remaining two squares.
7. Overlap the two sets of squares and zigzag stitch to complete the large square.
8. Lay the fabric down and lay the ceiling tile on top of the fabric; there should be a 3" seam allowance on all sides of the tile.
9. Place a dot of Fabri-Tac glue on one corner of the tile. Pull the fabric taut, fold it toward the center of the tile, and press. Continue this process until all four corners are folded and glued to the tile.
10. Place additional glue around the perimeter of the tile and fold the remaining fabric into the center of the tile.
11. Stick the ends of the 18" tape to the back of the tile, 2" from the top and 3" from the side edges - the tape will act as a hook.
12. Cut a 15"x15" piece of fabric (slightly smaller than the tile) and glue it to the back of the tile, covering the folded fabric to create a finished look.
13. Choose an assortment of studs and buttons and remove all supporting hardware (studs and button shank pieces) with jewelry wire cutters.
14. Using the E6000, stick the flat heavy-duty thumbtacks to the back of the snaps. This can be tricky, so make sure to lay it on a flat, solid surface while it dries. Let stand and dry for several hours..