(3) coordinating fabric prints, one each for middle, base and handles, and lining
the adhesive backing
thread
magnetic clasp
grosgrain ribbon
scissors
rotary cutting tool
sewing machine
iron
ironing board
rule
parchment paper for pattern
straight pins
Fray Check or lighter to seal the ends of the tape.
1. First, create the pattern. Using parchment paper and a ruler, draw a rectangle 7-1/2 inches tall by 13 inches wide, this will be the center panel of the tote bag. Cut out pattern from center panel and set aside. Then draw a rectangle that is 6 inches tall by 13 inches wide. At the bottom of this rectangle, cut a 2" x 2" square in each corner, this will be the bottom of the bag. Cut out pattern from bottom panel and set aside. Cut a rectangle three inches tall by 25 inches long for the handle pattern. Cut a 13" x 13" square to make the lining. On the bottom edge, cut out a 2" x 2" square in each corner, then set the lining pattern aside.
2. Pin the scroll patterns to the fabric and cut out the pieces. Cut two each from the center panel, the bottom and the handles. Then cut the fabric for the lining. Cut two pieces of fabric for the lining and one piece for the pocket. Tip:Using decorative or upholstery fabrics will result in a sturdier bag that will last a long time.
3. Once the fabric pieces are cut, iron as needed to remove wrinkles. The next step is to iron the fusible interface to give stability to the fabric. Measure the interface by laying it flat, sticky side up, placing one of the fabric pieces on top to use as a pattern. With a pair of sharp scissors, cut the interconnect. Preheat the iron, place it on the cotton fabric without steam. Then iron each piece of fabric to the interfacing following the manufacturer's instructions. Follow these steps to add an interface to the center and bottom pieces of the bag.
4. Interface the fabric for the handles below. Fold in the long sides of the handles with a 1/2-inch allowance and press. Match up the long sides of the handle and fold in half, then press. Set aside.
5. Sew the middle piece and bottom piece together with a 1/2-inch seam allowance. Repeat with the other middle and bottom piece. Next, press open seams on both panels.
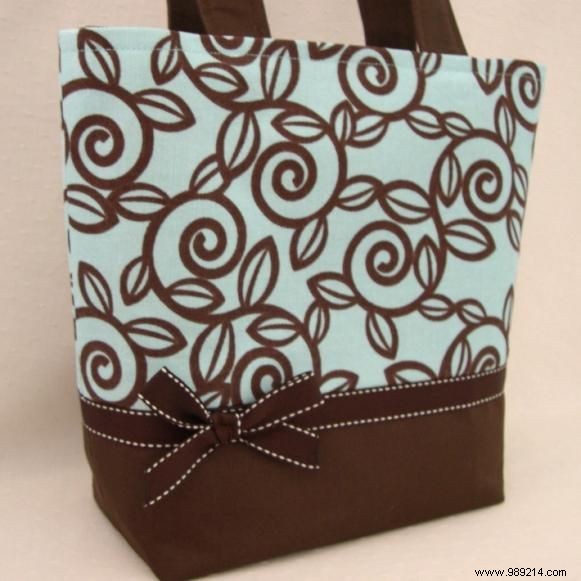
6. The next step is to add the ribbon border. Cut two strips of grosgrain ribbon slightly longer than the width of the bag. Create a hand-tied bow with a little more ribbon and set aside. Sew the edge strip of ribbon to the middle of the bag, following the seam between the middle and bottom fabric pieces. Sew as close to the edge of the ribbon as possible. Complete this step for each panel. Lastly, sew the bow over the ribbon.
7. Building the bag. Place both panels of the tote bag, right sides together, matching the edge of the ribbon. Sew one side of the panels together with a 1/2-inch seam allowance. Match the edge of the tape on the other side of the panel and machine seam with a 1/2-inch seam allowance. Then sew the base together with a 1/2 inch seam allowance.
8. Press the three seams open with an iron. Open the sides of the bag and the bottom of the bag and match the seam. Next, sew the side and base together with a 1/2-inch seam allowance on both sides.
9. Turn bag right side out. Fold top of bag over 1/2-inch and press. Then press the entire bag, starting with the side seams. Next, iron the back and front of the bag.
10. Pin the handles together with a 1/4-inch seam allowance and set aside.
11. The next step is to build the lining. Gather the pocket piece on the wrong side first, then turn the right side out and press the seams together. Next, pin the pocket piece to one piece of lining. Pin lines for dividing seams. Then sew the bottom edge of the pocket. Place both lining pieces on the right sides together. Sew both sides and the bottom piece together with a 1/2-inch seam allowance. Open the sides of the liner and the base of the liner and bring the seams together. Sew the side and bottom together with a 1/2-inch seam allowance on both sides. Press the top of the lining with an iron to remove wrinkles. Fold over top of liner 1/2-inch and press.
12. Now that the bag is roughly built, it's time to add the magnetic closure. Cut two 3" x 3" interlocking pieces and center them on top of the liner. Press the iron onto the lining. Measure the desired length from the top of the liner down to the magnetic snap holes, using two scissors to make two small slits. Flip the liner over and repeat the steps above. Separate the magnetic clasp into male and female pieces with a stabilizing ring each. Place the male piece and stabilizer ring on one side of the liner and fold over the fabric. Repeat for the female piece on the other side.
13. Next, attach both handles to the bag. Match the side seams of the liner to the side seams of the bag, pinning the liner in place. Sew the lining, handles, and bag with a 1/4-inch seam allowance, removing pins as you go.
14. The last step is to seal the ends of the ribbon to prevent fraying. Fray Check or heat seal the ends of the tape by holding them over an open flame.
Caroline Ritzer, Pink Lemondade Bags